
A few years ago I was lucky enough to see some professional screen printers in action. I was surprised at the overall simplicity of the process, but also quite impressed with just how cool it all was. As years of brilliant shirt design ideas came crashing back into my brain, I decided then and there that I had to get my very own screen printing gear as soon as possible. The first hurdle was when I realized that the impressive four-screen printing rack and drying machine they were using would set me back roughly the price of a used car and took up roughly the same space. And making matters worse, that wouldn’t even include any equipment for making the screens themselves. The second hurdle, which proved impossible to conquer, was when my wife refused to let me get a small business loan to start my new t-shirt company.
My next move was to scour the internet for any and all consumer level screen printing equipment. What I found was disappointing to say the least, ranging from seemingly random flimsy bits of equipment sold as a kit, to directions on how to build my own setup. We tried one of the highest rated consumer kits on the market and, although it was fun to see our designs come to life on t-shirts, onesies and more, the kit was overly complicated and required us to build our own light kit for exposing the screens. That, as well as having major design flaws that made it hard to secure the screens against the item to be screen printed, made it hard to use and a big mess to clean up afterwards.
 Not wanting to waste any more of my time and money with something that may only last through one design, I was absolutely thrilled when a few months later I found the Yudu Screen Printing Machine from Provo Craft. At approximately 32 x 21 inches and at an MSRP of $299, I knew the Yudu would fit perfectly into both our home, and our budget.
Why we love the Yudu:
What set the Yudu apart from the other screen printing kits we tried was that it was actually one well built machine with a great all-in-one design. With high quality pieces that are much closer to the professional screen printing set ups, the Yudu is the only home use screen printing kit I would recommend for those interested in starting out. The Yudu is made up of three basic pieces: an upper frame to hold the screen, a platen for holding the item you’re printing, and the base consisting of a light table with a drying rack underneath. This all-in-one design makes it easy to store as well as much easier to use, all without sacrificing quality.
How to use the Yudu:
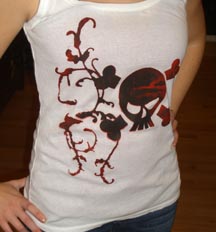
The first step to screen printing is to create your image, which you can do in a variety of ways. The simplest way is to use a computer and your choice of design programs and then print it onto a transparency sheet. Other options include tracing your image onto a transparency using the Yudu’s light table, or creating your image with pieces of paper or anything else with a distinctive enough shape. On our first effort, we used our Cricut Expression to cut out a large skull and crossbones with a scrolling design to add flourish. This allowed us to get extra creative with our limited artistic abilities and to get around the fact that we had al overlooked transparency sheets when collecting our screen printing supplies. To add even more distinction to our design, we distressed the edges of the scrolling design which worked amazingly well to soften the hard lines when screen printing later.
 Step two is to create the screen using your image and an emulsion sheet. You simply apply the emulsion sheet to the mesh screen of the Yudu with water and then place in the lower drying racks to adhere to the screen. Once the emulsion is dry, it’s time to apply your design and expose the screen to get your image permanently embedded in the screen. We simply laid the Cricut shapes on the emulsion screen in the configuration we wanted and then placed it all in the Yudu for exposing. Once it was exposed, we simply ran the screen under water and the negative image was developed on the screen. All the emulsion that is exposed to light stays on the screen while everything that is blocked by your image rinses away.
Once your newly made screen finishes drying, you are ready for the final step – putting your image on t-shirts, paper, and more. You simply arrange the item to be printed on the Yudu platen – a shirt guide with a tacky or sticky front to keep the object steady. Then you place your screen into the Yudu’s hinged lid, and pre-fill the screen with paint while the Yudu top is raised slightly. Once the paint is applied to the entire design, you simply set the screen down on the object you are branding and then squeegee the design right through the exposed mesh of your image.
If you'd like to see a video of the Yudu in action, check out some great how-to videos here.
Experimentation: At this point you can really make your own rules and go wild with your printing. If you’re anything like us you’ll be running around your house in no time looking for anything and everything that you might be able to print on. After grabbing a wild array of items, our next idea was to stop cleaning the screen between colors and instead just mix them up into one wild sloppy pile of ink (termed “nasty style” by our screen printing masters). It started as an experiment, but this turned out to produce our favorite shirts of all, creating random smears of color and leaving the design rugged and 100% unique.
 We found all sorts of things to screen print on, including t shirts, tank tops, onesies, and even thin shopping bags. The only things we weren’t able to get a clean image on were items that were bumpy that we couldn’t get to lay flat on the platen even with assistance. If you are really feeling brave, you can even take the Yudu screen off the Yudu unit and place on larger pieces that won’t fit on the Yudu platen, putting your images on an even wider variety of objects. We aren’t this brave yet, but haven’t ruled this out for future screen printing parties.
Another way to experiment with the Cricut and Yudu together is to screen print your design and then used cut fabrics from the Cricut (or, vice versa if you would like to screen print over your cut images) to add another dimension of fun to your projects. These multi-medium designs are another easy way to add multiple colors to your finished piece and even add in prints and fabric designs that would be difficult to create otherwise. We got to see a sample tote bag that was done at Craftacular in NYC and see an example of a finished piece using both the Cricut and the Yudu. After seeing that, we all decided that this will be our next Yudu project and we're going to be making totes and shirts for all our our family and friends with our new toys.
Clean up:
When we were finished experimenting and all of our items were printed, we had a kitchen and dining room stuffed with objects laying out to air dry while we cleaned up the screen. We decided that we were done with this particular design, having already printed half of our closet with the image and opted to use the emulsion remover the Yudu comes with to reclaim the screen and leave it clean and waiting for the next image we dreamt up. If we had been working on a large project and wanted to use our scull and crossbones design again, we could have simply washed the paint out of the screen and left it until the next screen printing session.
If you happen to make an image you think you may use a lot or just can’t think of parting with, you can always buy extra screens for $19 – $27 to have multiple screens ready to print at any given time. Having multiple screens is also a great way to make multi color images without having to tape off the screen and wash in between colors. As an added bonus, having a pre-made screen ready for printing shaves 80% of the time off your screen printing project and makes it so you can screen print quickly and easily without having a whole afternoon set aside.
 Accessories and replacement parts are readily available online and at craft stores nationwide, and I have a wishlist of Yudu accessories I am waiting on my local craft shop to restock. Number one on that list is a few new screens, because I would love to try out some multi color images that don’t involve random experimenting and be able to keep a few choice screens to use over and over again.
http://www.provocraft.com/ to see all product descriptions and prices as well as where to buy your own Yudu Screen Printing Machine.
A huge thank you to Provo Craft for sending us the best home screen printing kit ever; you have taken craft day to a whole new level and completely changed the way we think about home screen printing kits forever. As always, no monetary compensation was received for this Rave Review.

This is awesome!! Way more high-tec than my mom using her printer and an iron to put images on Tees 😛 There is something so gratifying about making your own designs/clothes and showing them off =)
I had so much fun doing this! I need to get more stuff to print on!
Hi, nice article about your experience with yudu. (Awesome skull design) I am thinking of getting one myself. I have a question. How did you blend the yellow and orange colors together in the skull design, instead of it being a solid yellow or a solid orange, instead of mixed together? Also how did you add a distressed look?
I’m glad you liked the Yudo article, we had fun getting really creative with our designs! For the multi color designs we did, some were done by simply not cleaning the screen of paint in between colors. The best effect was when we had previously done a red print and then simply filled black in on top of it in the screen. Since the red was only in parts of the screen where it was left from the previous print (particularly around the edges of the design) the finished product was awesome. Leaving the screens dirty between color changes led to quite a few experiments and not one bad print in the bunch. Another idea would be to simply paint in the screen however you like before pressing onto the item. This would give you a bit more control, but still incredibly unexpected prints since the act of squeegeeing the print on fabric would affect the final design.
For our distressed scroll image, we simply wiped at the edges of the emulsion before it was dried on the screen, which was incredibly easy and let to some really cool designs!
Good luck, the Yudo is amazingly fun!
Thanks for the tips. Just to make sure I’m understanding it correctly. If I wanted some parts of a design (let’s say the skull) to be orange blended with yellow. All I would have to do is paint a little orange on the screen before I cover the screen with yellow, before squeegeeing the ink onto the shirt? As for the distressed look I would be able to lightly wipe away some of the emulsion before it dryes? Thanks for the help.
I guess I didn’t explain very well, but the process is not exactly like you described. If you want only part of your design to be orange/yellow, you will need to tape off all other parts of the screen first, and then apply paint. Keep in mind that you will be smearing the ink down the screen in order to apply it to the shirt, so the final outcome will be a bit unpredictable – leading to the best results, in my opinion. You can’t really paint orange on the screen and then yellow on top of that, but you could do orange in certain areas of the scull (say, around the edges) and then yellow in the middle. When you squeegee the paint onto the shirt, it will cause the paint to blend and combine a bit, so you won’t get harsh lines of orange and yellow, and adds a little artistic flair. My best tip would be to try it on paper or something you can experiment on before trying your actual garment. We had a pile of things to screen print, which led us to begin to experiment and play around, but obviously if you only have one chance to get it right you will need to know approximately how the finished piece will look.
And yes, you completely got the emulsion distressing down. If you rub too hard before it dries you might distress too much, so a little really goes a long way! You may also want to dry it a bit before distressing, which is what we did to get the scroll a little less perfect on the edges.
Let me know if you have any more questions, I love to help people experiment!
Ohh, I LOVE the Yudu, and your ideas for getting extra creative sound awesome! I can’t wait to do some of these techniques.
WOW! I’m inspired! Your review exudes enthusiasm and makes me want to go out and get one right now (which I very well may do).
Just wondering – how is the integrity? Do the products hold up well with repeated washing?
Thanks for getting us all acquainted with Yudu!
Dave, that’s a great question and I’m glad you asked. The shirts, tees and onesies we created over three months ago are still in awesome shape after many repeated washings. In fact, my husband is wearing one of our Yudu creations in the new tri mode stroller vlog we just did and we’ve already gotten two comments on the cool shirt!
Thank you for sharing this information. The information was very helpful and saved a lot of my time.
can you use this machine to do hats?
New York City, USA.Thank you for your valuable information and reviews on Yudu.Visit for More guidelines on Yudu screen printing machine
What a cool machine
I want to Yudu so badly.
this post is absolutely informative! Keep and continue this process looking forward for more content
I realize you wrote this review article many years ago, and that you haven’t had any comments since 2021. However, I am a big Yudu fan and long-time user, but only when used with the better-quality Yudu Aftermarket screens rather than the screens that accompany the Yudu, as they are junk. These aftermarket screens for the Yudu were previously available from a couple of companies, but both discontinued making and selling them. I am trying to spread the word to Yudu fans that there is now a new Yudu aftermarket screen being produced by Anuvision Marketing Solutions, a small company in Utah. The Yudu aftermarket screens are available on both eBay and Etsy at the present time, FYI.
Thanks for your suggestions! I hope it helps another Yudu user